Pages

Thursday, December 29, 2011

Project Highlights of 2011

As we approach the start of the new year I have been thinking alot about what all took place in 2011. I am so thankful for those of your who follow and read along! It has been an exciting year of growth and I have loved meeting everyone in the blogging word.

As my last post in 2011, I wanted to do a quick recap of my favorite projects this year. It was hard to choose just one project per month but I narrowed it down!

January

February

March

April

May

June

July

August

September

October

November

December

I can't wait to see what this new year brings! I hope you all have a safe and happy new year! Blessing to each of you :) See you in 2012!

Family Tree

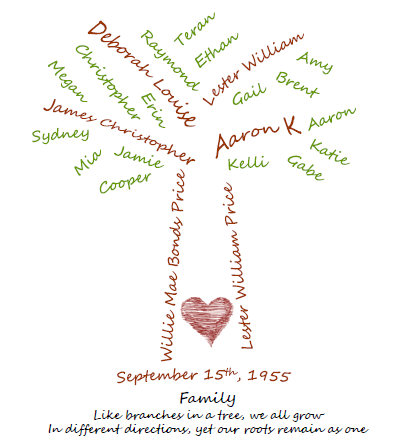
This Christmas, I decided to make my grandmother a family tree. I have seen many different Etsy shops making them by hand, but I decided to try my hand at it on my computer.

At first, I tried to draw it out by hand but I hate my handwriting. So, after erasing the entire thing several times, I hopped on my laptop. Here is the final picture that I printed out and framed.
 I used PowerPoint to make my family tree. I started by changing the dimensions of the slide to be 8X10 so that it would be the exact size I needed for the frame when I went to print it out. To do so you go under the design tab in PPT 2007 and when you click on Page Setup, a menu will pop up and you can change the height and width of the slide.


Then, I used text boxes to start building out the tree. Each person in the family got their own text box and was placed and angled to come out of their parent's branch. I used different colored fonts to make the branches and the leaves.

I also brought in a clipart heart in the base of the tree.

This was easy to make once I decided on the placement of the names. I plan to update it once cousins get married and start having kids of their own. I just love how clearly it shows where we come from and that the love of my grandparents is what started this wonderful family. I love you MeMaw!!!

Tuesday, December 27, 2011

Ready to Cook After Christmas

I have been working hard to become a better cook and have really started to enjoy cooking and baking. This Christmas I was given quite a few things to assist me in my cooking ventures. I am soo excited about them!

 My mom gave me 3 new cooking and entertaining books and I can't wait to dive into them.

She also gave me an awesome recipe journal that I started writing recipes in last night, mainly dessert and cocktail recipes :)

I received a bread maker from Gabe's grandparents and I will be baking bread ASAP.

My grandmother gave me a buffet server and warming tray that will be perfect for entertaining.

My brother and sister in law gave me a mini crockpot for my yummy dips and soups and it is red!

My cousin, Erin, gave me a new kitchen rug with our last name on it, isn't it so cute?!

 I also got an iPad that I am loving! All of these pictures were taken with it!

Thursday, December 22, 2011

Handmade Christmas Gifts

I can't believe it is almost Christmas Day! We celebrated Christmas with Gabe's family last night and we are heading out of town this morning to celebrate with my family! I decided to make some of our gifts this year and wanted to share them with you now that they have all been given out!

I made quite a few dropcloth pillows with painted initials on them...


I also made my sista, Blair, a teal pedestal with a cloche. Check out this tutorial to see how.

I also made my mom a pillow out of a table runner. I cut the table runner in half and used it for the front of the pillow and used a piece of dropcloth, cut to the same size, for the back of the pillow.

Merry Christmas!!!

Wednesday, December 21, 2011

Best Cornbread Ever!

I know I don't normally share recipes with you, mainly because I don't have any good ones to share, but I just have to give this amazing cornbread recipe to you.

Back when Gabe was in elementary school, he had a teacher that made cornbread for a class party. Gabe came home talking about it and asked his mom to make that cornbread for their upcoming Thanksgiving dinner. Gabe's mom asked his teacher for the recipe and has been making it ever since.

This cornbread is sweet and moist, unlike a traditional southern cornbread. I LOVE this stuff! To the point where I will take left overs in my purse with me...it's that bad :)

Tomorrow is the hubby's birthday and we are having a little get together tonight to celebrate with friends and family! We are having chili and this cornbread is the perfect side for it! Love the smell of this yummy chili cooking...


Here is a pic of the batch I just made...the piece missing is from my taste testing :)

Sooo here it goes:

Ingredients:
  • 2 boxes of Jiffy corn muffin mix
  • 2 cups of sour cream
  • 2 sticks of butter (melted)
  • 2 eggs
  • 1/2 cup of milk
  • 1 can of cream corn
Just mix all of the ingredients and pour into a 9x13 greased pan.

Cook at 400 degrees for 20-30 minutes or until there is a golden brown edge.

This stuff is great hot or cold or warm temp.....it is just GOOD!

Thursday, December 15, 2011

Third Day of Christmas: A Few Decor Ideas

It is only 10 days til Christmas! I can't believe it! I am at a point where I am really liking our decor...but still love so many ideas out there. I wanted to share those ideas with you today. I may wind up completing some of them this year but if not, they are on my "Holiday Ideas" Pinterest board for next year!

I love this pompom wreath from Craftaholics Anonymous! I love the neutral wreath and festive pompoms that can be changed out in different seasons...

I also really want to make my own tree skirt. I am embarrassed to say that I am currently using a really tiny one that we used on a table tree in our first apartment. I refuse to buy one, because I really want to DIY one. That hasn't happened yet but I really like this one from Horchow as inspiration. Don't you just love those ruffly layers?!

I love these personalized stocking hangers from Crap I've Made. They look easy enough. Our stockings are currently hanging from thumbtacks that I stuck in our mantel, classy, I know. I really want to make our own and I think the tutorial from Crap I've Made is perfect!

There are probably 100 other things on my Pinterest boards that I would love to make but these are definitely on the top of my list!

Today, we exchanged gifts again for the third day of Christmas! I gave Gabe a tie rack to help him organize his large tie selection! He gave me an adorable brown belt (I think he is tired of my pants hanging low, haha)!

I am flying to Fort Lauderdale in the morning to spend the weekend with my mom! I am so excited to have her all to myself (yes, I am selfish like that!). I will be back on Monday!

In anticipation of my weekend away, I gave Gabe another gift a little early. It was a small robot bug. I will leave you with a video of Bentley and the robot bug! :)


Wednesday, December 14, 2011

Second Day of Christmas: Dog Pillow

I really love making my own pillows....to the point where some of our loved ones will be receiving them as Christmas gifts this year :) This evening, I decided to make a new pillow for our home. I used drop cloth for fabric and used freezer paper to make my stencil.

I found a picture of a dog using Microsoft Clip Art and printed it out. I traced it out on the paper side of a piece of freezer paper (shiny side down).

Next, I cut it out and ironed it onto one piece of dropcloth.

For a picture tutorial, check out this post on my anniversary pillow.

Next, I painted the dog black and immediately peeled the freezer paper off. I am always so amazed at how crisp and clean the stencil is thanks to the freezer paper.

Once the paint was dry, I sewed the two sides of the pillow together, leaving a small part of one side open to stuff.

Once I stuffed it, I hand stitched the opening up and it was finished!


Bentley really likes it too...

Today, we celebrated the 2nd day of Christmas....Gabe gave me an awesome robe from Kohls.

 I gave Gabe a head massager, which feels soooo good!


Can't wait for the third day of Christmas!

Tuesday, December 13, 2011

First Day of Christmas: Sweet and Simple Christmas Mantel

I visited my sweet neighbor and best friend tonight and took a few quick shots of her cute Christmas mantel.

It is so simple and cute and is really just made up of two hurricane vases filled with red ornaments and greenery surrounding the bases. 

I also love her "Christmas in Dixie" sign. It's such a cute addition to a southern household. 

Today was the first day of Christmas in our house! Gabe and I give each other a small gift everyday from today until Christmas! It is a lot of fun and makes the final countdown really exciting! Check out our gifts from today....

Gabe gave me an adorable travel coffee mug and fuzzy gloves. I gave him a Duke business card holder for his desk at work. I can't wait to exchange again in the morning!

Thursday, December 8, 2011

The receiving side of the Handmade Gift Exchange

Remember the cloche I made for the Craftaholics Anonymous Handmade Gift Exchange?! Well I received a gift from my exchange partner, Kristi. I was so excited to open my puffy envelope to find a beautiful hand knit hat in a beautiful shade of green!

She also made me a set of beautiful Birthday cards!


Thanks Kristi for my beautiful gifts! Thanks to Linda at Craftaholics Anonymous for hosting a great gift exchange! Can't wait for the next one!

Monday, December 5, 2011

Ribbon Tree

This past weekend, Gabe and I went to Winston Salem, NC with his family to Old Salem where we attended the Candle Tea. Afterwards, we went to dinner at the local K&W and as we were leaving, we saw these cute ribbon trees for sale. A local woman was making them and selling them. We thought they looked pretty simple to make.

So, yesterday evening when my mother in law came over to have dinner with us, she surprised me with all the supplies to make them! How awesome is that!?

I want to share these awesome ribbon trees with you! Check out the final product...

This is how we made them...

You will need...
- One Styrofoam Cone per tree
- Ribbon
- Floral pins or Straight pins
- Mini Strand of lights per tree (we used battery powered LED lights)
- Optional: hot glue gun and star for the top of the tree

Here are our supplies (even though 3 rolls of ribbon are shown, we only used 2/3's of one roll for our two trees)....


We used floral pins to secure the ribbon but straight pins would work too...

First, cut the ribbon into strips, fold each strip in half to make a bubble and pin it to the bottom of the cone to start building the first layer of your tree...

Keep pinning the strips all the way around...

Then, start the next layer, making the strips slighted shorter than the first layer...


Keep adding layers until you have covered the entire cone. You will then need to use one more strip to cover the tip of the cone. I used hot glue to glue it on because I didn't want pins visible at the top...


Lastly, wrap your lights around the tree, starting at the top and working your way down. We used battery powered lights, so we put the battery box under the tree, which doubled as great stand for the tree itself.


Mine found a home in the living room...


I am in LOVE with it! These were so easy to make and barely took us any time to do. Using battery powered lights gives me a lot of flexibility in where I can put it, but regular lights would work just as well. I suggest using mini lights though so that they are relative in size to your mini tree. I think these make adorable decorations and would be great hostess gifts for Christmas parties!

I hope you all have a great week! I am in Boston for work til Wednesday night. REALLY missing my hubby and sweet puppy!!!