I am so PUMPED to show you our Master Bedroom today!!! I am absolutely in LOVE with it!! NO joke!
I know I have never shown anyone our master before....and it is because I have never really liked it. When we moved into our house, everything that I did not like in the main living area ended up in our room. I want to show you a before picture first...this is from the MLS list for our house...
Then we moved in and made it look like this...
There isn't too much going on....the dresser really steals your attention because it is huge. The bedding is mismatched and not calming. I have been brainstorming for a while looking for inspiration. We decided to paint the room....which we completed last weekend. This weekend, my parents came to town and my mom helped me shop for the rest of the room! There are some things that we shopped my house for...and others we went shopping for. We got everything from HomeGoods and Target (except for a quick trip to Kirkland's). So HERE IT IS!!!
When you first walk in, this is the first thing you see on the wall opposite the bed...
On the left when you come in, my vanity is set up for getting ready...
I am obsessed with this cozy corner!!!
We hung some special things above the chair. A drawing of our Callie (Gabe's grandpa did it!), a cross, and a drawing of a camp that I used to go to every summer.
We are loving the TV on our new dresser with some simple accent pieces...
The blue/grey curtains bring a lot of warmth to the room...
This mirror is on the wall next to the bed. I thought about doing a gallery wall here but when I saw this mirror, there was no turning back! :)
I could not be more in love with our bed!! We used an old room divider as a headboard with my burlap wreath hanging from it.
I am in love! It is sooo cozy!
Here is a look at the before and after pictures side by side...
Here is a list of where everything came from...
White Chair- HomeGoods
White Dresser- Thrift Store find with a makeover
Standing Mirror- Craigslist find that my hubby painted
Wall Mirror- HomeGoods
Vanity- Antique Find
Vanity Stool- Flea Market find with recovering job
Anniversary Pillow- Made out of dropcloth- tutorial here
Burlap Wreath- Tutorial Here
Head Board Shutters- Used an old divider
Curtains and Rods- Target
Standing Lamp- Kirkland's
Vanity Lamp- Target
Comforter, Bedskirt, and Euro Shams- Target (Comforter is made by Shabby Chic)
Thanks for checking out our room!!!
Sunday, January 15, 2012
Thursday, January 12, 2012
January Craft Night- I love you because...
When it came time to decide on a project for our January craft night, I thought of a recent project that one of my very best friends recently showed me. My friend Taylor (College Roomie, Soul Sister, and Co-Author of Shabby Chic Chicks) made an awesome "I Love you Because" dry erase frame. We used it as our inspiration tonight.
I asked everyone to bring their own frame and then armed with loads of scrapbooking paper, stamps, stickers, markers, fabric scraps, and the infamous (and dangerous) gluegun....we each came out with our own spin on it.
Please check out Shabby Chic Chicks' tutorial to see how to make it!
Here is a look at our craft night and finished projects...
I asked everyone to bring their own frame and then armed with loads of scrapbooking paper, stamps, stickers, markers, fabric scraps, and the infamous (and dangerous) gluegun....we each came out with our own spin on it.
Please check out Shabby Chic Chicks' tutorial to see how to make it!
Here is a look at our craft night and finished projects...
Cutting out the paper...
Picking out paper...
Cutting fabric for our flowers...
Sarah's finished project..."I love you like crazy because..."
Mica's finished project... "I love you because..."
Kara's Scripture Memory Board...
Erin's dry erase board...
I made a "What's for Dinner?" dry erase menu....
Allie couldn't be with us all night but did stop by and Sarah made her a little something.
I cannot even begin to express how much I love our craft group. It has become something that I really look forward to every month. Although it is a great outlet for our creativity, it is also a great time for lots of conversation and laughter. So thankful for these awesome girls!
Tuesday, January 10, 2012
Vanity Stools
I have been using an old vanity for my sewing machine table in my craft room for a while now. I recently decided that it would be a great addition to our master bedroom. I wanted to find a little stool for the vanity that would be easy to tuck out of the way.
This past weekend, we went to the local flea market and as I was walking by a booth, I saw 2 old vanity stools. I asked the booth owner for the price of the larger of the two and she said that she would give me both stools for $15. I took that deal immediately (especially when there was another lady looking at them!).
They weren't in the best shape (both seats have torn fabric and the iron bases are rusting) but I was prepared to give them a makeover. Here is a before shot of them...
I decided to use the larger one at the vanity (I will show you the final picture of it when we reveal our Master Bedroom Makeover!). It is getting a paint job and I am recovering that seat.
The smaller one is going in my closet to use for putting on shoes.
I think it is a cute addition to the newly organized closet! I spray-painted the stool white and recovered the seat by hot gluing fabric on it. This piece of fabric is actually part of a table runner that I had left over after making my mom a pillow with it.
I also tried out a trick I saw on Pinterest.....using shower curtain rings on a hanger to hang scarves. It works like a charm and gives me an easy way to sort through my scarf options! I bought a cheap set of shower curtain rings at Wal-Mart and just hooked them onto the hanger, and then pulled my scarves through the rings.
This past weekend, we went to the local flea market and as I was walking by a booth, I saw 2 old vanity stools. I asked the booth owner for the price of the larger of the two and she said that she would give me both stools for $15. I took that deal immediately (especially when there was another lady looking at them!).
They weren't in the best shape (both seats have torn fabric and the iron bases are rusting) but I was prepared to give them a makeover. Here is a before shot of them...
I decided to use the larger one at the vanity (I will show you the final picture of it when we reveal our Master Bedroom Makeover!). It is getting a paint job and I am recovering that seat.
The smaller one is going in my closet to use for putting on shoes.
I think it is a cute addition to the newly organized closet! I spray-painted the stool white and recovered the seat by hot gluing fabric on it. This piece of fabric is actually part of a table runner that I had left over after making my mom a pillow with it.
I also tried out a trick I saw on Pinterest.....using shower curtain rings on a hanger to hang scarves. It works like a charm and gives me an easy way to sort through my scarf options! I bought a cheap set of shower curtain rings at Wal-Mart and just hooked them onto the hanger, and then pulled my scarves through the rings.
Sunday, January 8, 2012
Dresser Makeover
We have been in need of a new dresser for a while now. We have been using a hand me down from my in laws since we moved into our first apartment as newlyweds. It is a great dresser but it is really large and not the color finish I have been wanting. In preparation for our master makeover, I began hunting for a new dresser. I found one at a local thrift store for only $25 and it has been sitting in our guest room ever since.
This morning, we finally got around to painting it! I was extremely thrilled when the hubby looked at me and said, "I would like to paint this for you hunny." I was SO PUMPED! First of all, he is a great painter. He takes his time to make sure everything is perfect and doesn't speed through things like I do. Secondly, we painted our room this afternoon and I had lots to do to prep for that, so it allowed me some extra time!
Here is a before shot of the dresser...you may recognize it from my project goals post last week.
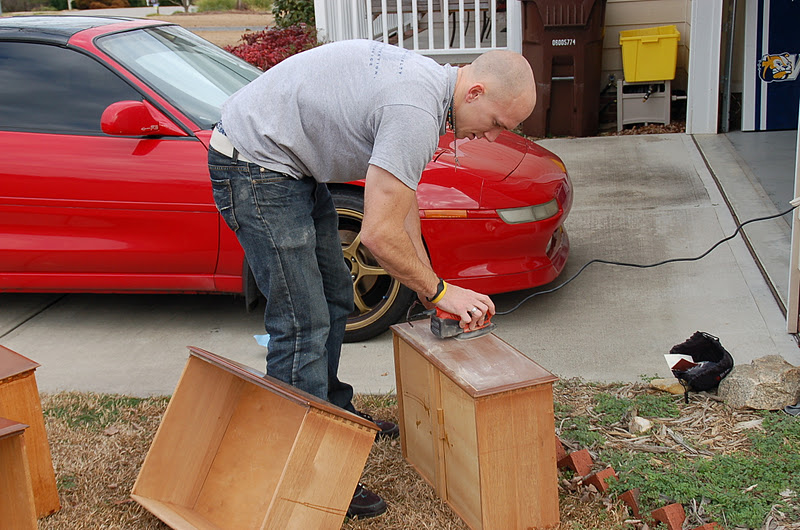
Gabe started by sanding the drawer fronts and the top and sides of the dresser...
Then he started spray painting them in the side yard...
After he finished, we went shopping for new handles. The top drawers have an abnormal size handle that our Home Depot didn't have. Since the handles seemed impossible to find and were going to be an expensive special order, I decided to try something new that I have seen on a few blogs. I decided to buy rope to make my own handles. This is an extremely cost effective solution for drawer handles and I love the natural look it gives the dresser.
I cut the rope and started wrapping the ends in tape to help put them through the screw holes where the previous handles had been. Once both ends were through, I tied knots on the inside of the drawer. It was so simple!
Take a look at the finished product...
We are loving it!!! We finished painting the room this evening and have been moving everything back in! I am hoping to show off the finished master soon!!! Here's one final before and after comparison...
This morning, we finally got around to painting it! I was extremely thrilled when the hubby looked at me and said, "I would like to paint this for you hunny." I was SO PUMPED! First of all, he is a great painter. He takes his time to make sure everything is perfect and doesn't speed through things like I do. Secondly, we painted our room this afternoon and I had lots to do to prep for that, so it allowed me some extra time!
Here is a before shot of the dresser...you may recognize it from my project goals post last week.
Gabe started by sanding the drawer fronts and the top and sides of the dresser...
Then he started spray painting them in the side yard...
After he finished, we went shopping for new handles. The top drawers have an abnormal size handle that our Home Depot didn't have. Since the handles seemed impossible to find and were going to be an expensive special order, I decided to try something new that I have seen on a few blogs. I decided to buy rope to make my own handles. This is an extremely cost effective solution for drawer handles and I love the natural look it gives the dresser.
I cut the rope and started wrapping the ends in tape to help put them through the screw holes where the previous handles had been. Once both ends were through, I tied knots on the inside of the drawer. It was so simple!
Take a look at the finished product...
We are loving it!!! We finished painting the room this evening and have been moving everything back in! I am hoping to show off the finished master soon!!! Here's one final before and after comparison...
Wednesday, January 4, 2012
Barstool Makeover
I have been really motivated lately to get things done! That is one thing I love about a new year, it seems to put a fire under me to get going! Everything I have touched has been organized. I went to get a glass the other day and the next thing I know, I have a bag of plastic cups to donate and an organized cabinet. I did the same thing to my night stand drawer last night when I went to get a book out of it.
The other night, I decided to paint my new bar stool. It was a flea market find for $10. I love sitting in the kitchen while things are cooking so I can keep an eye on things. I have a stool that I painted green a while back that has been working just fine up until I found this one.
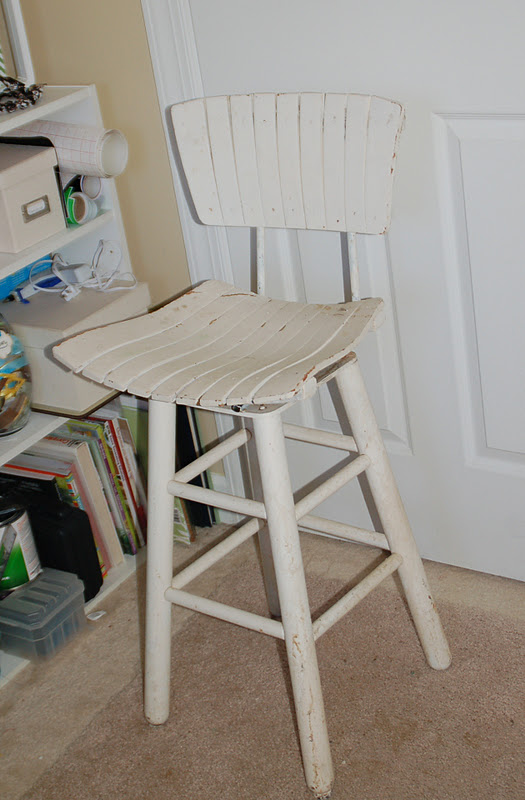
When I saw this one at the flea market, I was so excited about the thought of a stool with a back! It was white when I bought it which would've worked but it was very dirty and chipped. Here is the before shot of it...
I decided to paint it a very light shade of gray with a blue tint. It is so light that it could be mistaken for white. Which is fine with me.
I am really loving this new addition to our kitchen, I even sat on it at the island while I ate my lunch today.
The other night, I decided to paint my new bar stool. It was a flea market find for $10. I love sitting in the kitchen while things are cooking so I can keep an eye on things. I have a stool that I painted green a while back that has been working just fine up until I found this one.
When I saw this one at the flea market, I was so excited about the thought of a stool with a back! It was white when I bought it which would've worked but it was very dirty and chipped. Here is the before shot of it...
I decided to paint it a very light shade of gray with a blue tint. It is so light that it could be mistaken for white. Which is fine with me.
I am really loving this new addition to our kitchen, I even sat on it at the island while I ate my lunch today.
Tuesday, January 3, 2012
Closet Organization
I have been in desperate need of a closet clean out and organization for a long while now. In preparation for our master bedroom redo, I need to move most of my clothing into my walk in closet. Our new dresser is a little smaller than our current one and since the hubby has a smaller closet, he will need all of the dresser space.
After hours of reorganizing, I ended up with 9 bags of stuff to be donated and a clean walk in closet. I am hoping to use it more as dressing room now that all of my clothing is in there.
Here is a look at the finished organization project. The pictures go in order from the left hand side when you walk in, working your way around to the right.
The little sign you see on the tray is from our wedding. We asked our guests to write out their wishes for us. My grandmother wrote us such an amazing wish. I have had it on this little stand on our dresser since our wedding.
It says "A Wish...That you will be in love forever, as many years as PaPa and me." Seriously the best wish, they always showed us what love looks like in every situation.
I have a few more tweaks to make but I really love how clean and organized it is!
After hours of reorganizing, I ended up with 9 bags of stuff to be donated and a clean walk in closet. I am hoping to use it more as dressing room now that all of my clothing is in there.
Here is a look at the finished organization project. The pictures go in order from the left hand side when you walk in, working your way around to the right.
Jewelry...
Non-hanging tops, bottoms,etc...
Purses...
I put a tray of some getting ready essentials so I have them close by when I get dressed...
Shoes...will need a step ladder to reach some of them...
Hanging clothes...
Luggage, other bags, etc...
The little sign you see on the tray is from our wedding. We asked our guests to write out their wishes for us. My grandmother wrote us such an amazing wish. I have had it on this little stand on our dresser since our wedding.
It says "A Wish...That you will be in love forever, as many years as PaPa and me." Seriously the best wish, they always showed us what love looks like in every situation.
I have a few more tweaks to make but I really love how clean and organized it is!
Monday, January 2, 2012
2012 Project Goals
Happy New Year! Do you have a lot of resolutions?! This year, I found myself with a long list of personal goals and things I want to change. I am really excited to get moving and get my butt in gear!
I also have some project goals that I want to complete this year. I want to share those with you today. I have a tendency to buy furniture or supplies with every intent to complete the project soon but it doesn't always happen as planned.
I need to paint and/or refinish quite a few pieces of furniture/decor. Let's check them out...
I also have some project goals that I want to complete this year. I want to share those with you today. I have a tendency to buy furniture or supplies with every intent to complete the project soon but it doesn't always happen as planned.
I need to paint and/or refinish quite a few pieces of furniture/decor. Let's check them out...
Swivel Bar Stool for the kitchen island...it needs a paint job
Dresser for the Master Bedroom (to replace our current one)...it needs a paint job and new handles (we have all of the drawers too)
Large Mirror for Master or Guest Bedroom (undecided)
Sewing Machine Table...it needs a paint job
We will also be revamping our Master Bedroom! I am so incredibly excited about it! We are planning to paint the walls soon. My mom is going to come spend a weekend with us this month to help us get the room redesigned! She has the best taste and I am excited to work on it with her. There will definitely be a large before and after post of the room when it is finished!!!
I can't wait to get started on all the projects! I am going to try to make myself finish these before buying anything else. I hope you will join me for another year of Thrifty Finds and Redesigns!
Subscribe to:
Posts (Atom)