Pages

Thursday, May 31, 2012

Wreath Trio with Fabric Flowers


In preparation for my craft night back in March (when we made grapevine wreaths) I decided to shop online to see if I could purchase grapevine wreaths in bulk. I was so excited to find a site that would sell a set of 10 for a couple dollars a piece. Much to my dismay, I must have misread the dimensions.... when the box arrived, I opened it to find 10 mini grapevine wreaths. I knew that they weren't going to cut it for craft night, so I quickly solved the issue by going out to by regular sized wreaths :)

The other day, while organizing my craft supplies, I stumbled upon the box of mini wreaths and started brainstorming how I could use them.

Last night, my dear friend, Emily came over for dinner and we decided to craft it up using the mini wreaths. We thought that a trio of the wreaths would be really cool....we could string them together and hang them down a door or window.

We scrounged around my fabric bin and chose the colors we wanted and got to work on fabric flowers. A few glue burns later, we had our wreath completely decorated. Emily used ribbon to attach her three wreaths to one another and I used strips of chevron fabric.

Here we are with our wreath trios...

Bentley had to pose with us :)

I decided to hang mine in our dining area, on one of our pantry doors...


Here are some close ups of my wreaths...


I am so happy with how they turned out and now I don't feel like the mini wreaths went to waste!

Monday, May 28, 2012

Indoor Succulent Garden

Happy Memorial Day everyone!
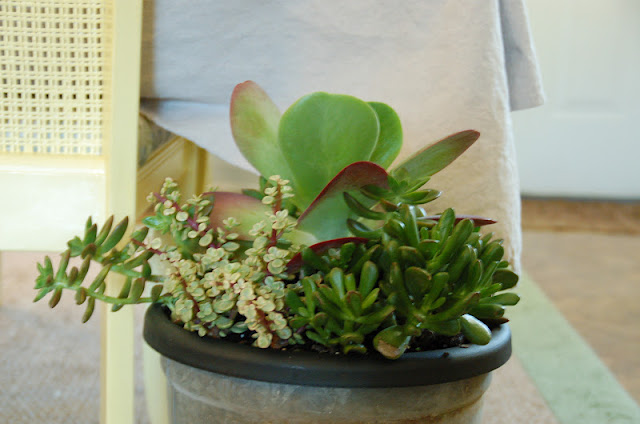
Yesterday I ran into Wal-Mart and saw a beautiful arrangement of succulents all growing in one big pot and I was in love instantly! I have always been a fan of succulents and it is a popular trend to grow gardens of them all together. The large arrangement was only $13!

I brought mine home and stuck it in my galvanized bucket that I found a few months ago on my trip to Asheville....

 Notice it's large size up against my table and chairs in the background. The diameter of the plant is a little under a foot!


I am so excited about the mix of succulents all growing together! They are so low maintenance....watered only once a month! If you are in the area and want to grab one, I only saw them at the Holly Springs WalMart in the gardening section!

Sunday, May 27, 2012

Burlap and Blue Party Decor

Yesterday, we had the pleasure of hosting a party for my in laws for their 30th Wedding Anniversary! The planning for this event has been in the works for a few months now and I have been making some things for decoration.

I decided to use dropcloth to cover the tables and purchased burlap runners from an Etsy Shop.


I made placecards out of blue cardstock and used burlap to make a little flower with a button center. I used a clothespin to stand the cards up. I also made burlap pockets to hold our silverware (tutorial on these coming soon!).


The drink station was outfitted with a clothepin wreath that held family photos. Each pitcher was marked with a drink tag as well.

I made two burlap banners as well...


Here are a few other shots from the party! We had it catered by Moes! The Fajita Bar was AMAZING!


We had such an amazing time! I just love all of the burlap!

Saturday, May 19, 2012

DIY Drink Tags for Party Hosting

Whenever we host a party, it is always easier to have a drinks set up for our guests to serve themselves. This frees us up to mingle and prep the food. I have found that I am still somehow "manning" the drinks even if I am not serving them, to let everyone know what each pitcher contains.

A few weeks ago, I saw some adorable drink tags on Pinterest that are being sold by Ballard Designs. I thought they looked pretty easy to DIY! Today, I went off to Michaels in search of wooden tags. I found a six pack of little wooden tags for $2.99 (I used a 40% coupon so they were even cheaper)!


I came home and asked the hubby to drill a hole in each one....


Then I wrote on them using a black sharpie...


I used jute to string through the holes and hang them from my pitchers...


I can't wait to use these at our next party! Thanks to Ballard Designs for a great idea that only cost me a couple bucks!

Tuesday, May 15, 2012

Mother's Day Brunch Recipes

This Mother's Day we had the honor of hosting brunch for my mother in law. I absolutely LOVE hosting any type of get together and was really excited to make some yummy recipes for our brunch! I want to share them with you today....they all turned out so yummy and would be great for any occasion, maybe Father's Day!


Our Mother's Day Brunch Menu
Ham Rolls
Bacon and Cheddar Quiche
Honey Apple Brie Bites
Fresh Strawberries

I found a great quiche recipe on About.com. I followed it precisely for the filling but instead of making my own crust, I used Pillsbury Pie Crust and baked it for 10 minutes before adding the filling and baking it for 30 minutes. 

The Honey Apple Brie Bites are a Pampered Chef recipe from the Appetizer's Recipe Book. It is such a yummy recipe! I LOVE it!! You have got to try them out!

The Ham Rolls are a popular dish in the Nail family...and I know many other families love them too and call them "Hammie Delights"! The are delicious! I want to share the recipe with you here today!

Ham Rolls

Ingredients:
  • Hawaiian Rolls- I always use a 24 pack, found in the bread section of the grocery store
  • 1 Cup of Mustard
  • 2 Tbsp of Worcestershire Sauce
  • 1 Tbsp Poppy seeds
  • 1 lb Ham
  • 8 slices of Mozzarella Cheese
  • Aluminum Foil
Steps:
  1.  Preheat the oven to 350 degrees
  2. Slice all of the rolls in half- I leave all of the tops and bottoms connected to each other so they are like one giant piece of bread
  3. Place the bottom halves on aluminum foil
  4. Mix mustard, Worcestershire sauce, and poppy seeds together
  5. Spread mustard mix on the inside of the top and bottom halves of the rolls
  6. Place ham on bottom half of the rolls
  7. Place cheese slices on top of ham
  8. Put the tops of the rolls on the cheese to "close" the sandwich
  9. Wrap the rolls in aluminum foil and place in the oven
  10. Bake for 30 minutes

I think my mother in law really enjoyed her brunch! I also got to spend the afternoon with my mom at a cookout with our extended family! It was such a great day! I hope all of you mom's were honored this weekend!


On another note, I found a new chair at our local thrift store. I have had my eye on it for weeks now and last weekend I told the hubs that if was still there the next time we came in, it was coming home with us! Well, not only was it there, but it was $20 cheaper! So it was only $50. Check it out! (No, I am not recovering it!, I LOVE the green and the fabric is in perfect condition!)

 It found a home in our guest bedroom...

I hope you are all having a great week so far! I am working on some items for my Etsy Shop, which I hope to get back up and running soon!!!

Saturday, May 12, 2012

Celebrate Burlap Banner

I always so inspired by my best friend, Taylor. She recently made a burlap banner to go over her master bed. I have been wanting to make my own for a while now and finally finished it! I decided to make a banner that says "Celebrate" to use on birthdays and other occasions.

Supplies:
  • Burlap
  • Ribbon
  • Paint and paintbrush
  • Scissors or fabric cutter
Here is how I made my banner:

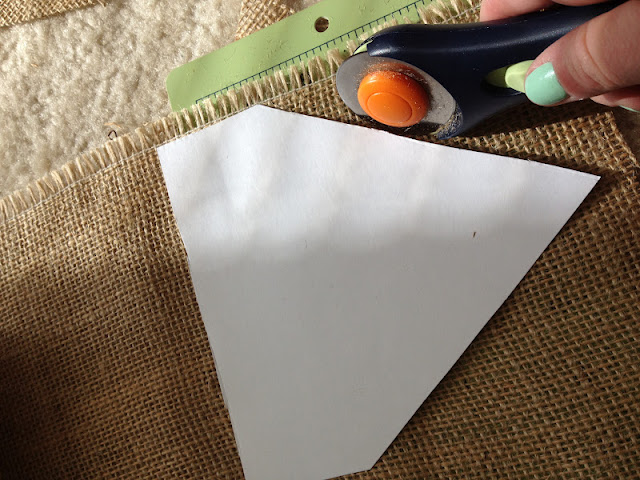
I cut a pattern out of cardstock...I used a ruler and pen to draw out a clean pattern and then I cut it out...

I laid the pattern onto the burlap and cut out enough pennants to spell out my word, "celebrate". Using the fabric cutter in the picture made this process go by quickly.

I used white paint to hand paint a letter onto each pennant. I let it dry over night and did another coat the next day to make the letters really bright and crisp.

 It really helps when you have a cute little helper :)

When the paint was dry, I cut a slit on each side of the top of each pennant and I strung the ribbon through each letter.

At this point, I was finished and ready to hang it up!


Now we just need to throw a party! :)

Friday, May 11, 2012

DIY Mother's Day Craft for Little Ones

Happy Friday everyone! As Mother's Day is quickly approaching, I know some of us are in need of a last minute gift idea for our moms. My wonderful cousin, Rachel, shared an awesome idea with me that she made for her Mother and Mother in Law. I have asked her to share her gift idea with us today! Take it away Rach!

~~~~~~~~~~~~~~~~~~~~~~~~~~~~~~~~~~~~~~~~~~~~~~~~~~~~~~~~~~~~~~~~~~~

So, I've never written anything for a blog before, and I am so excited and a tad bit honored to be asked by my sweet, talented cousin Katie to do this. I love this blog and the great ideas featured, and hope some of you find this one helpful, or at least a little inspirational.


This is a sweet little handprint of my 19 month old son's, that was turned into a 'lil chickadee in a nest. I decided to frame it in a cheap (but oh so cute!) shabby white frame from IKEA and write the little poem on the mat of the frame and use it for Mother's Day gifts for the grandparents. I wish I could take credit for coming up with this, but I basically searched "Mother's Day handprint gift ideas" and this was one of a gazillion that popped up. The lady used these to make cards, but I took it a step further. SUPER easy, which I love.

Supplies needed:
  • Background paper (color of your choosing, I used beige for my momma and blue for my MIL to go with their decors)
  • Paint for the handprint (again- choose your color, anything will work!)
  • Yellow paint for beak
  • Brown paper (you can use a grocery or lunch bag for this- use whatever you can, I found mine in our recycling bin)
  • Frame (if you choose to frame it)
  • Google-y eye - I didn't use this, I just drew the eye with a black marker
Here's how it is done:
  1. Paint or place the hand in the paint to cover it (If you have a little one like me, I make a game out of painting his hand- this tickles him and he thinks it's fun, and I get better coverage)
  2. Place hand on paper and press firmly (ideally his fingers should have been much closer together, but what are you going to do?;) NOTE: the thumb should be on the bottom, as it will be covered with the brown paper for the nest, your chickadee may face opposite of mine if you used a different hand)
  3. Rinse the hand or use the opposite one to paint the pointer finger yellow and use as the beak
  4. Rip brown paper into small-ish pieces and when the paint is dry glue them at the bottom to form a nest
  5. When paint is dry, either draw an eye with a marker or glue a google-y eye on.
  6. Voila- you're finished! Mine was all lopsided and not centered on the paper, but I just used the mat as an outline and cut it out for the frame and it worked great. The poem reads " I love you, you love me, I'll always be your chickadee." Precious!

Hope all of the moms reading this have a fabulous Mother's Day!

Monday, May 7, 2012

Clothespin Wreath

Today I want to share a quick and easy DIY clothespin wreath idea with you. We have an event coming up in the next few weeks (will share more as the time passes but since it includes some surprises...I am keeping my lips sealed for now!) and I wanted a way to display photos without framing a bunch of pictures. Frames would cost money and space to set them all up.

For this clothespin wreath you need:

  • A large embroidery hoop (I found mine at a thrift store for $1 but you can buy them new at Michaels or any craft supply store)
  • Clothespins- I used around 40 (3 packs are pictured but I only needed 1 of them)
  • Glue gun and gluesticks

This is so simple it seems silly to even write a tutorial! All you do is glue the clothespins on to the hoop. I turned them to face the opposite direction every other clothespin.


I wanted the clothespins to face in and out so I could put pictures or cards inside and outside of the hoop. To test it out, I went ahead a put some pictures on it once the glue cooled...


I am going to hang it from ribbon at our event coming up to display pictures! I think this would be great for Christmas or Birthday Cards too! This took me no time to make....about 20 minutes to be exact! I may go back later and add some color to it by painting the tops of the clothespins with alternating colors....but we shall see!

Happy Monday!