Pages

Saturday, April 14, 2012

Hello New Coffee Table!

Today has been such a beautiful and fun day! We started off our day at the Pet Bull Palooza in Raleigh. It was put on by The Positive Pitbull. Bentley had a great time meeting new people and dogs, he also got some freebies: a rabies vaccination, food, treats, and an appointment to be neutered for free next month.

After that we ventured out to the flea market to hunt for a coffee table! As I was checking out a few tables, Gabe called me over to one a few aisles away that he had spotted. It was perfect! He also talked the guy down a bit in the price, which made it even better! Check out the new table!


I am in love with this table! I love that it is old with tons of character, wooden and not glass, that it fits the style and character of our home, that it is a creamy green color, and so huge with tons of storage!!! Props to the hubby for finding such a great table!

I love the old chippy goodness....


Check out the storage in this baby...

It is perfect for all of our games. They were previously spaced out all over the house and now they are in one central location with easy access....

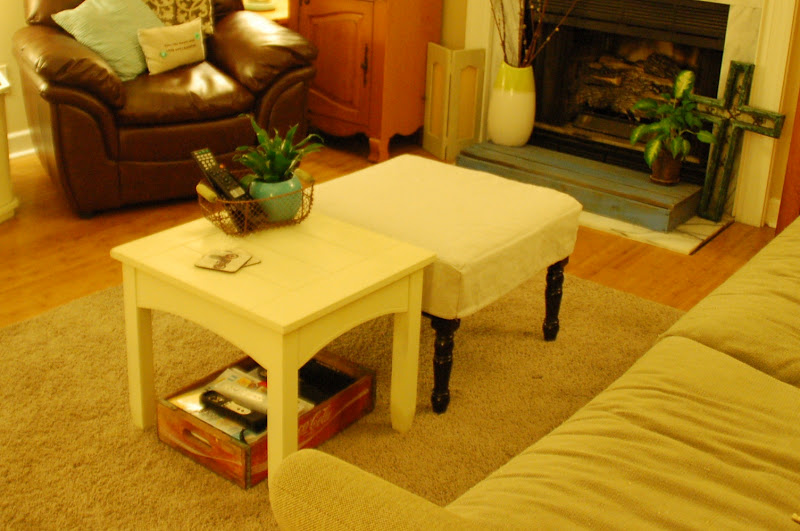
Here is a before and after shot of the old coffee table vs. the new one!

Thank you so much to those of you who gave me input on my temporary solution! I know I didn't get a chance to write you all back yet but you all had great words of wisdom and were so right! It was not a great look for many reasons! I would love to hear what you think about this new piece!

Another beautiful thing about this new table is that it cost less than HALF of what we sold our old one for! Thanks to the profit, I just ordered new fabric for outdoor pillows and for an upcoming dining room project (chair makeover!!!). I LOVE it when this happens! Happy Saturday!

Wednesday, April 11, 2012

Goodbye Coffee Table

I hope you all had a great Easter weekend! When we got home from a lovely weekend at the beach with my parents I decided to list our coffee table on Craigslist. I caught myself looking at coffee tables all weekend while we shopped. I was just in the mood for something new. I decided to be wise and sell our current table first (or try to) and then buy a new one.

Here is our current table. It is a great table, I just like to change things up every now and then!

I am happy to announce that this table sold 2 days later! A guy drove an hour to get out here and didn't even try to negotiate the price, just handed me the cash and loaded it up! Gotta love a smooth and easy Craigslist transaction!

Now that there is a gaping hole in our living room from the coffee table sale....I have been playing around with this ottoman/table combo. The hubby really likes it....and I am still deciding.

This smaller combo really makes the room feel much larger and I am really liking that. I am still going to look for a table this weekend to see if I like something better. Now that I made the sale, I definitely have the cash to get a new one but if I stick with this combo I can get something else instead! What do you think about this combo?! Is it awkward? hah- I can't pinpoint what it is that I don't love about it!


On another note....I tried two new recipes this week....both were found on Pinterest...

Monday's dinner was this Chicken Crescent Roll Casserole.....YUM

Tonight I made these yummy Glazed Doughnut Muffins. I love new baking recipes....especially when I have everything I need already in my pantry and fridge.

Here is a look at mine (not as pretty as the tutorial's!)


I am dying to create something but have been swamped with life and work these days :) I am hoping to get back at it this weekend! Have a great evening!

Wednesday, April 4, 2012

Spring Finds

Over the past few weekends I have done some shopping and thrifting. I have been eager to share my finds with you and today is the day!

A few weekends ago my mom and I spent a weekend together in the mountains of NC. Some of my mom's friends told her about the coolest shop, Screen Door ,and we decided to scope it out!

I found this awesome metal ceiling tile....I don't know where I am putting it yet but I am excited to incorporate it somehow!

One of the vendors there was selling wheatgrass patches in these awesome planters she made. I picked one up to use inside to bring some Spring green inside :)

Last weekend, Gabe and I went to our favorite local thrift shop, Guardian Angel, and found an awesome vintage metal glider! Once we finish getting the patio cleaned up for this season, we are finding a new spot for it!

It is another crazy week around here! The hubby's softball season started yesterday and our 3 year anniversary is today!!! We are also getting prepped for a weekend away at the beach with my parents!

Other exciting news: today is the final day of my 30 day work out challenge! Gabe challenged me to exercising for 30 days.... more like 6 weeks of exercise with 2 days off per week. I am sad to say that I have not seen the greatest results but I do feel sooo much better and more energetic! I am not stopping at 30 days....I want to make some big changes and be a healthier person all around! I am excited o continue the journey and thankful for my amazing support system. The hubby has been so great with holding me accountable and challenging me even when I have been soo stubborn!!!

I hope you all have a great week! I hope to get some projects completed soon to share with you!

Saturday, March 31, 2012

Spring Wreaths: March Craft Night

This week we had our monthly craft night. Since the warm weather is upon us, we made Spring wreaths to cheer up our front doors.

We used grapevine wreaths purchased from WalMart....they have some great ones by Better Homes and Gardens.

We decorated our wreaths with fabric flowers. Some flowers were rolled into rosettes and others were made by stacking burlap circles and topping with buttons. It was a hot glue gun kind of night!


Here they are all ready to go! They all look similar from a far but up close you can see that each one is unique with our personal fabric choices!

Here is Kaitlin with her wreath...

Sarah with hers...

Here is mine on the front door...


I hope you are all having a great Saturday! It started off rainy but has turned into a beautiful day! I spent my morning in a photography class and I am so excited to put my new skills to good use! Have a great weekend!

Thursday, March 22, 2012

Easy Silhouette Art- Freezer Paper on a Canvas

Some good friends of ours had to say goodbye to their sweet dog a couple months ago. We really felt for them, knowing what it is like to lose a dog when it is way too young. For us, after the initial pain was gone, I wanted mementos and reminders of Callie in our home. I thought our friends may soon feel the same way. I decided to try using freezer paper on a canvas to create a silhouette of a dog. The freezer paper did not seal as well as it does on fabric but it still worked!

Check out my finished product...

I started by making a dog silhouette on my computer....you can download a copy here.

Then I traced it onto freezer paper, cut it out, and ironed it onto my canvas. Since the freezer paper was covering up the dog's silhouette, I painted all around it with a gray paint.

Once the paint dried, I pulled off the freezer paper and it was finished!


I am heading off in the morning for a girls weekend with my mom in Asheville! I am so extremely excited!! I can't wait to have some fun time with my wonderful mom! Hope you all have a great weekend!

Friday, March 16, 2012

DIY Embridery Floss Easter Eggs

One of my favorite college buddies, Julie, and I had planned to get together yesterday and craft the night away. Julie lives about 45 minutes away, which isn't too bad but it was still far enough to turn it into a sleepover! We stayed up so late crafting and eating frozen grapes and cookies!

Last week Julie sent me a tutorial for embroidery floss Easter eggs, suggesting that we make them while we were together. I was soo pumped about the idea! We decided to go for it.

We followed Crafty Endeavor's tutorial to learn how to make these fun Easter eggs!

What you need to make the eggs:
  • Sta Flo liquid starch....found on most detergent aisles
  • Flour
  • Embroidery floss (you know the stuff you use to make friendship bracelets with?)--- get a bunch of colors! One skein of floss will cover one balloon
  • Balloons (we did not use water balloons as suggested by Crafty Endeavor but I think they would've worked better!)
To start, I would recommend blowing up your balloons...that way you aren't having to wash your hands in between each egg wrapping just to blow up another balloon....we finally caught on to that a few eggs in :)

After you blow up your balloons, make your gluey mixture. You need to mix 1 Cup of liquid starch with 1/2 Cup of flour. Mix it really good and get all the clumps out. We doubled this mixture to start and then ending up making a little more later on after finishing some of the eggs and realizing we needed a little more.

Next you need to get to wrapping those balloons!

These are the steps we took and were most happy with (after trying multiple processes and not liking them as much)...
  1. Completely unwind the skein of floss you are going to use so that it doesn't tangle and knot as you are wrapping the balloon.
  2. Rub a VERY light coat of the glue onto your balloon to make it sticky.
  3. Start wrapping the yarn around the balloon....we did not care about making any patterns...just tried to evenly cover the balloon with the floss.
  4. Once the balloon is wrapped, dip the tips of your fingers into the glue mix and spread it onto the floss wrapped balloon. Try to make sure most of the floss is covered so that all of it will harden. It does not need to be thick but use enough to make the floss nice and wet.
  5. Lay the balloon onto wax paper to dry...we flipped ours after a few hours but then let them harden over night. 
  6. REPEAT with your next balloon and keep on trucking until your heart's content.
  7. Once the floss has completely hardened you can pop the balloons. We used toothpicks to pop them and then the balloons collapsed and shriveled up....really cool to watch but hard to describe! Then we pulled the balloons out through the biggest gaps in the floss.
  8. You can finish by scraping off excess hardened glue and stick them in a vase or string them together to make an egg garland. 
Here they are hardening...


Notes and Warnings:
  • We tried coating the floss in the glue first and then wrapping around the balloon but found it to be more difficult but the eggs all turned out the same no matter which method we used.
  • I also wrapped up a plastic cup with some floss using the same method...it turned into a cool little floss cup :)
  • Use NEW balloons....we used some old ones and some of them deflated as they were drying, which caused the eggs to collapse! Not cool! See the pictures below to see what I mean...'


Here is a shot of mine on display on my kitchen island!


This was a very messy but very fun project! I put a fitted sheet down to wrap around my table to protect it from the glue. We then put wax paper down to put the eggs on so that the sheet wouldn't stick to the eggs. Be prepared to have a mess but a lot of fun if you try this out!

Monday, March 12, 2012

Music Notes on Canvas

As some of you may remember, my birthday was last month and for my birthday, my wonderful sister in law, Blair, made me a beautiful piece of art. She put the music notes from our first dance on  a canvas. I love the constant reminder of our wedding night and our beautiful first dance. I have asked Blair to give us some insider info on how she made it...take it away Blair!

~~~~~~~~~~~~~~~~~~~~~~~~~~~~~~~~~~~~~~~~~~~~~~~~~~~~~~~~~~~~~~~~~
Thankfully someone created Pinterest, which means for people who are crafty, you’ll never run out of ideas of things to create. I can’t tell you how many times I run across something that I say to myself, “I can make that!” So for Katie’s birthday I decided to make something I found from Pinterest that I had been wanting to make. The blog this pin originated from is Scout & Nimble and let me just say this woman is awesome! She has a lot of “do-able” projects.

The song I chose is Katie and Gabe’s first dance song. You can find most popular sheet music at musicnotes.com. The blog had such good instructions, I followed it exactly. This is such a fun, quick activity (I hate waiting to put stuff together) that it can be put together in a day with all the materials handy.

Here are the materials you will need:
  • A Canvas
  • An open wood frame fitting the size of your canvas. 
  • Mod Podge
  • foam brush
  • old phone book or newspaper, torn into long strips
  • tea bag steeped in a little water
Please check out Scout and Nimble's tutorial for instructions on making your own!

~~~~~~~~~~~~~~~~~~~~~~~~~~~~~~~~~~~~~~~~~~~~~~~~~~~~~~~~~~~~~~~~~
Thanks Blair! I am thinking this would be a great post-wedding gift idea or an anniversary present. I know that our mother in law is already reminding Blair of their wedding song :) Thank you Blair for such a thoughtful birthday gift and for leading us to a great tutorial!

Here it is in our home...


Happy Monday!!!